TEGU Enterprise Quick Start
Choose a language: RU | EN | ZH
- Содержание
- TEGU Enterprise Quick Start
- Introduction.
- Quick Start TEGU Enterprise
- DNS zones
- Router configuration
- TEGU Enterprise mail server installing
- Installing and configuring of Postgres
- Initial configuration
- Tegu main settings
- Configuring the message queue
- Configuring user database settings.
- Installing and generating Letsencrypt certificates
- DKIM generation
- Final fine tuning of DNS
- Mailbox management
Introduction.
This section is aimed at setting you up for quick installation and configuration of the mail server, as well as minimizing losses during the process of testing our product.
For this purpose we have set out all the material in as much detail as possible, taking into account all the subtleties and pitfalls that you can expect in the process of this work.
We purposely did not focus on different operating systems, but concentrated only on Linux Debian as a reference.
But this does not mean that you have to choose this particular distribution, on the contrary, it all depends on your experience and technical background.
What we want to draw your attention to first of all:
It is necessary to carefully study the article “quick start”, follow each step clearly in strict sequence without skipping any section, otherwise you risk wasting time.
To control each step, it is better to make a checkup sheet and strictly record each of your steps in the process of completing the task:
- Remember that six hours of debugging can save you five minutes of reading the documentation, but we recommend that you start by reading it.
- When installing a server for the first time, learn how to do it in the simplest way, and only then start building exotic schemes.
- Properly specify all DNS zones. (if possible, the best option is if the resource records will be public, otherwise again there is a chance of wasting time configuring and debugging internal DNS zones. )
- Make the necessary routing settings.
- Install Tegu mail server.
- Install and configure Postgres databases.
- Make initial mail server settings.
- Add mail storage.
- Configure message queues.
- Integrate with the directory server (here you need to approach this section pedantically and very scrupulously, all settings are individual for each directory server, incorrectly prescribed parameters can not guarantee correct operation, so we recommend you to focus your attention on this stage of configuration).
- Install and configure certificates.
- Generate DKIM.
- Perform final configuration of DNS zones.
- Install licenses.
- Start testing the product.
Rules for contacting technical support:
- Remember, a brief description is an unnecessary waste of your time. We will be in dialog with you until we have all the information necessary to solve the issue.
- Therefore, your appeal should be as informative as possible.
- Description of the problem should be step-by-step, without omission of actions, without generalizations, without using ambiguous slang, in simple words, strictly in terms of the system.
- Provide information about your system. To do this, run the command /opt/tegu/bin/teguctl dump and return its output to us.
- Enable and analyze system log messages. To do this, use the command journalctl -f -u tegu -n 200 -a
- If you do not speak English to read the log, use a translator.
- When contacting tech support, please cite the part of the log that relates to the problem you are describing.
- If possible, accompany your description with screenshots.
- When describing your actions, please be sure to provide links to the documentation according to which you performed the work.
Quick Start TEGU Enterprise
This article allows you to quickly install and start the TEGU Mail Server. The article does not cover all possible configurations, does not describe all features and therefore does not override reading the rest of the documentation.
A few words about Tegu. Unlike all other similar systems, this product is written completely from scratch and is a single compiled file,
which can work and run on all modern Linux operating systems based on systemd,
and there are no dependencies on systemd libraries.
As a result, you get a fully working web interface out of the box, no additional components like apache or nginx,
built-in protection against password brute force on mailboxes and the web interface itself.
Web interface.
Starting from version 1.43.1 there are a number of cardinal changes:
Stable version with new interface
A brand new web interface for administrator and user management has been implemented.
Added English language support (in the future - Chinese).
Added interactive documentation.
Added search throughout the interface.
Improved and developed functions of controls (pagination, search etc).
Regrouped a number of controls.
The interface is prepared for role model implementation and full multitenancy.
Further development of TEGU will be realized on this interface.
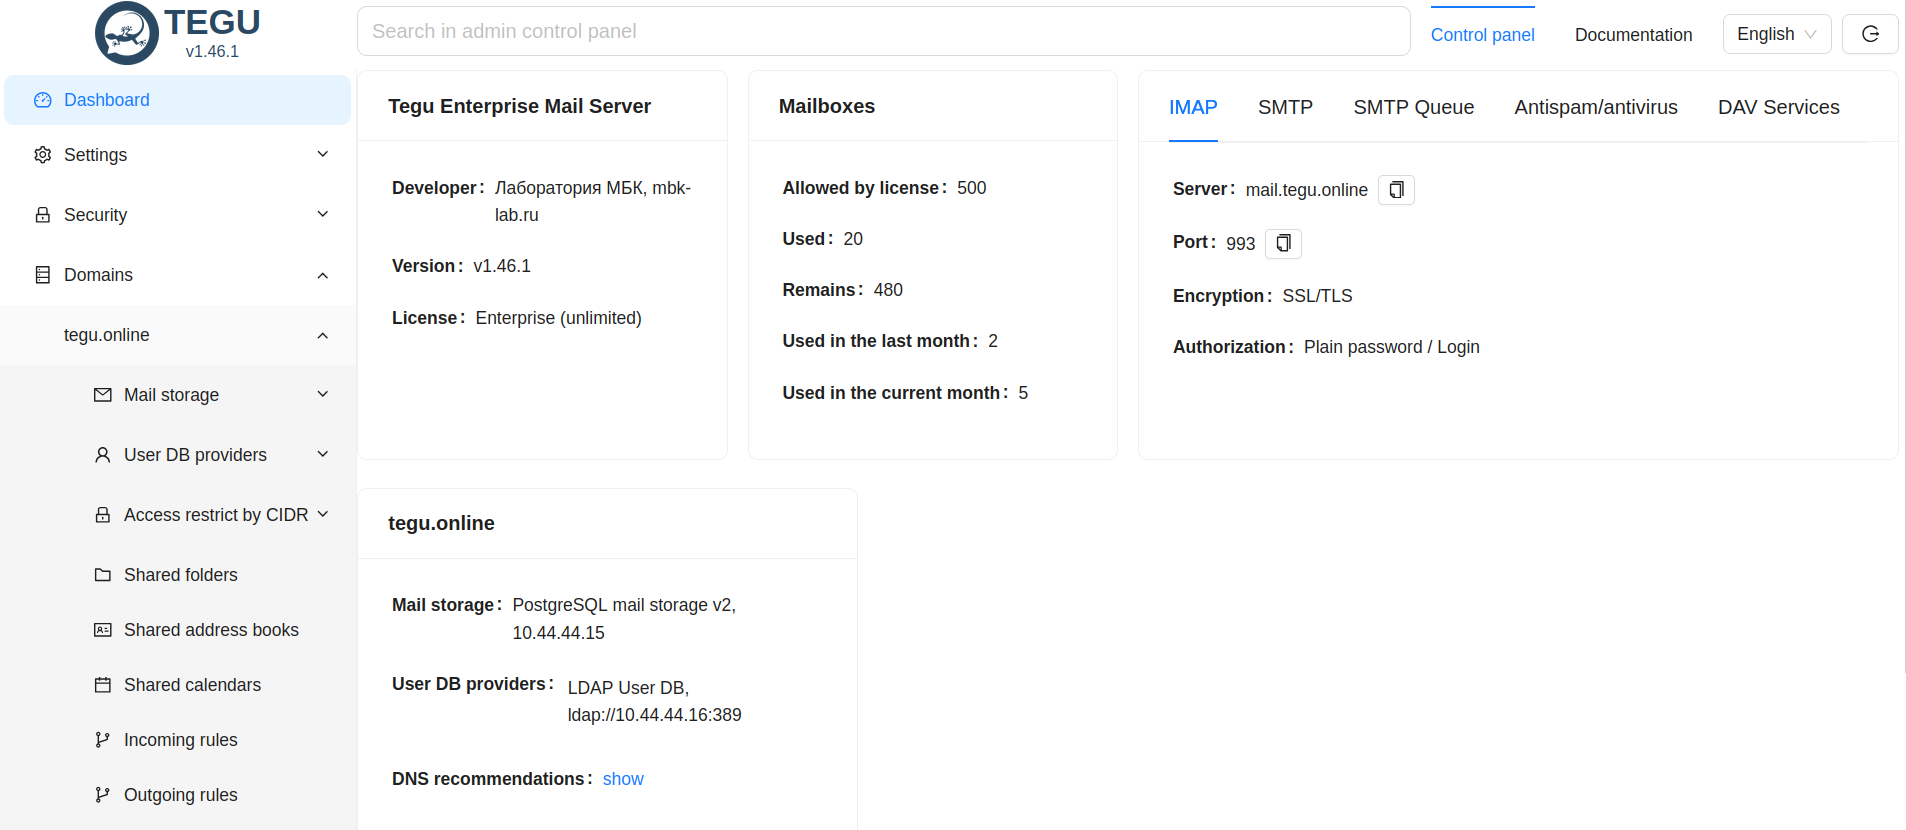

Mail server editions:.
Tegu exists in two different editions:
Free - free to use, recommended by the manufacturer for up to 50 mailboxes,
Tegu Enterprise is a commercial server that supports centralized mail storage in Postgres database, unlimited support for horizontal scaling of compute nodes, built-in shared individual and calendar server, and address book server, both shared and individual.
External Services:.
Tegu in working with directory servers, does not maintain or synchronize the user base anywhere, and thus does not allow passwords to be compromised.
As directory servers can be Microsoft Active Directory, ALD Pro, FreeIPA, OpenLDAP in unlimited number.
*IMPORTANT: Tegu does not make changes to LDAP, including changing account passwords.
Tegu Enterprise data architecture:
The TEGU server uses three stores in its operation for:
1. configuration storage.
2. SMTP queue storage.
3. storage of data (mail messages, calendars, address books, etc.).
Storages can be local or network.
- SQLite on a local disk or Postgres on a network resource can be used to store configuration and queues.
- For data storage, the server can use a local disk in MailDir format or Postgres on a network share.
Deploying the mail server:
What we will need to successfully deploy a mail system:
Knowledge and understanding of the basics of: networking, mail protocols, DNS, directory services and a clear sequence of steps in this article.
Necessary components for deployment:.
Linux Debian 12 operating system, postgres, certificate, directory server (assuming you have it installed and configured), port forwarding on the router.
Today we are considering installation in a single-node configuration together with the postgres database, (in a production system, the database should always be placed separately from the post node).
*Preparation work.
- “Request a TEGU test license”:https://mbk-lab.ru/get-test-licence/
- “Download the TEGU distribution”:https://downloads.mbk-lab.ru/
DNS zones
DNS (Domain Name System) - is a globally distributed database that stores records for each Internet domain.
For the successful operation of the mail server, it is necessary to correctly and competently once prescribe DNS zones and forget about them.
As a rule, in practice I meet a lot of erroneous and on the one hand ridiculous configurations in DNS zones:
lack of DKIM, MX, SFP or the presence of more than one SFP record, there is also such a thing that some records are prescribed incorrectly,
as a result of which mail doesn't reach the server simply because DNS doesn't know it exists.
Conclusion: DNS is the foundation on which the future work of your mail server depends and it is not recommended to ignore or skip this section.
What DNS entries should be made and what are they responsible for?
SOA (Start of Authority) record - Describes the basic/initial zone settings.
There should only be one SOA record for each zone, and it should be the first one.
NS (name server) records - Indicates the servers to which the domain is delegated.
(as a rule, they are already present when you order an Internet domain from the hoster)
A (address record) - Maps the host name (domain name) to an IPv4 address.
One A record must be made for each network interface on the machine.
- MX* (mail exchange) records - Specifies the hosts to deliver mail addressed to the domain.
(perhaps the most important record, without which the mail system cannot function).
TXT record for DKIM - A mechanism to verify whether the sender is valid or not.
The verification is done by means of a digital signature, the public part of which is located in the DNS of the corresponding zone.
DKIM protects against sending a message with a spoofed sender address.
TXT writing for DMARC is a mechanism for reducing spam and phishing emails.
DMARC describes the action to be taken by the server for emails that fail DKIM and SPF checks.
It also describes the address to which a report on these actions will be sent once a day.
DNS reverse zone is a special domain zone that allows reverse resolution of domain names relative to IP addresses.
Only one type A record, called a PTR, is actually allowed for the reverse zone.
Important - before you set up a mail server, you should ask your ISP for a PTR record,
otherwise you risk compromising both the domain name and your IP address during initial communication with other mail servers.
Recovery can take a very significant amount of time.
During the initial configuration of the mail server in the basic settings, the server has recently suggested itself what records to make in the DNS zone.
But if for some reason you do not know or do not understand what you need to write, this item can be moved to the moment when we start to customize the mail server after all the settings there will be a tooltip with all the parameters.
And if you have already made all the necessary entries, now it's time to check DNS zones.
Check NS records:
$ host -t ns tegu.online
tegu.online name server ns4-cloud.nic.ru.
tegu.online name server ns4-l2.nic.ru.
tegu.online name server ns8-cloud.nic.ru.
tegu.online name server ns3-l2.nic.ru.
tegu.online name server ns8-l2.nic.ru.
Check CNAME records:
$ host mail.tegu.online
mail.tegu.online has address 79.137.210.127
*♪ Check MX:♪
$ host -t mx tegu.online
tegu.online mail is handled by 10 mail.tegu.online.
Check TXT records for SPF:
$ host -t txt tegu.online
tegu.online descriptive text “v=spf1 mx -all”
Check TXT record for DMARC:
$ host -t txt _dmarc.tegu.online
_dmarc.tegu.online descriptive text “v=DMARC1; p=quarantine; rua=mailto:abuse@tegu.online”
Check TXT record for DKIM:
$ host -t txt mail._domainkey.tegu.online
mail._domainkey.tegu. online descriptive text “v=DKIM1; h=sha256; k=rsa; p=MIGfMA0GCSqGSIb3DQEBAQUAA4GNADCBiQKKBgQDRKjngoDbWD3Cj1NHc/GB9YB4i3bjmJV2R0HfVpph2Hze1e6u1a9p8PiTkZQOA/Meuusb9YwrnxD27L+boZways1CQvWWvK3aySEWMy5VcauJw3BBNRJK4cMwlXv1DC9hzrFLqjynVQfqtKGk3Dgm6K+nH1IBu6ZVUwCC35nQQQQIDAQAB”
Router configuration
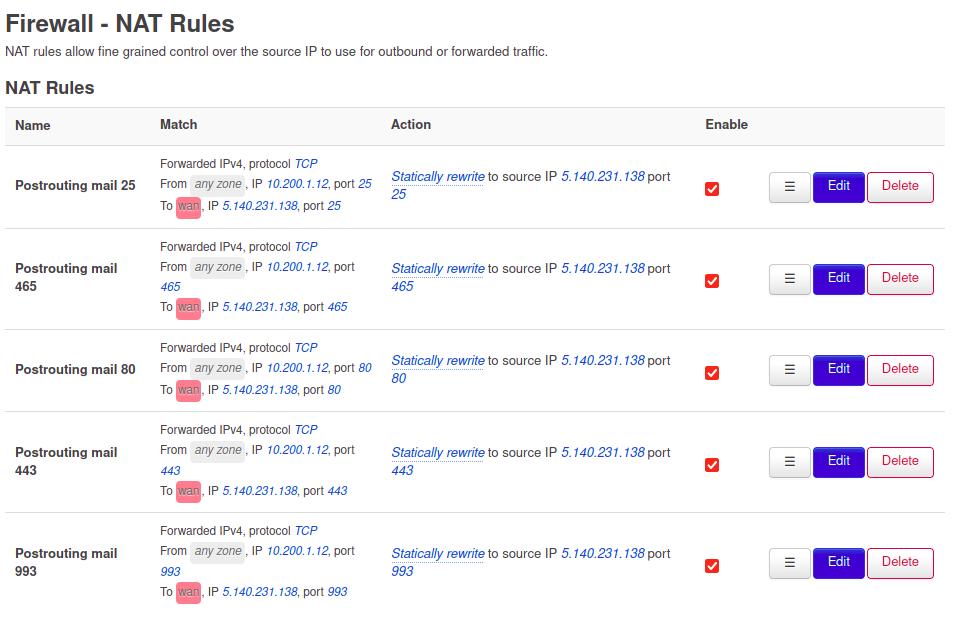
Forwarding ports outward for correct server operation.
Standard TCP ports for a mail server:
25, 80, 443, 465, 993 everything else is optional..
On routers with OpenWRT firmware all ports are forwarded in the “Port Forwards” section
It is also important to specify Yandex DNS as DNS on the virtual machine with mail server: Yandex DNS
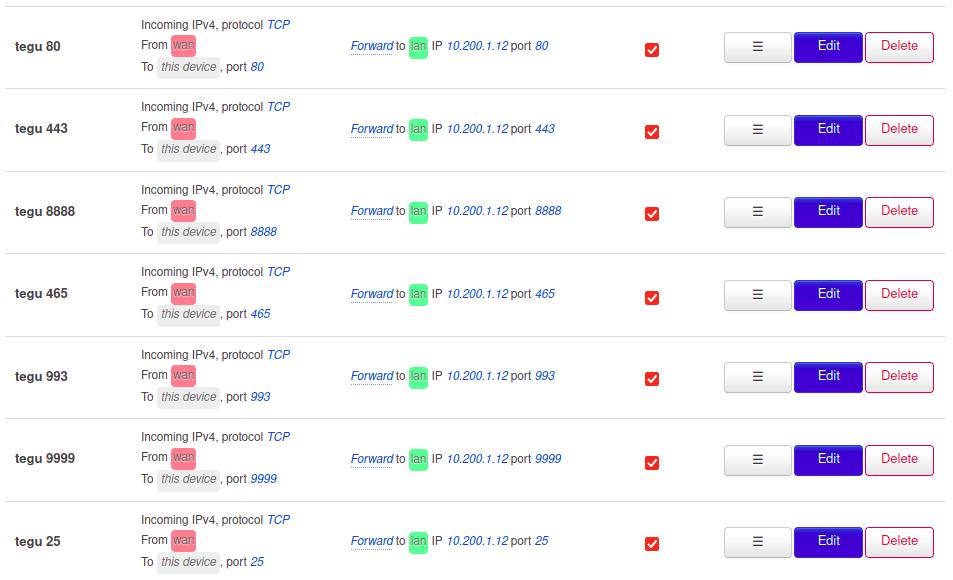
and NAT Rules.
TEGU Enterprise mail server installing
Important - before installation it is necessary to check if there is Postfix installed in the system
or any other mail server, if yes, it should be removed, otherwise it will interfere with us and occupy ports.
Also note that the teguctl utility has full access to the server parameters, so for security reasons it should be given the right permissions to run it
In Debian this can be done as follows:
*Check
systemctl status postfix
*Delete
apt purge postfix
Before installing, please note that all work must be done as root.
Go to the page with distributions. https://downloads.mbk-lab.ru/.
copy the link, at the time of writing this article with tegu-ent-v1.42.18-x86_64.tar.gz version.
It is important not to confuse the architecture, the fact is that Tegu compiles under both x86_64 and arm architectures.
Next, in the console, paste the link with the wget command
wget https://downloads.mbk-lab.ru/stable/enterprise/x86_64/1.42/tegu-ent-v1.42.18-x86_64.tar.gz
Unpack it here
$ tar -xvf tegu-ent-v1.42.18-x86_64.tar.gz
tegu-ent-v1.42.18-x86_64/
tegu-ent-v1.42.18-x86_64/sbin/
tegu-ent-v1.42.18-x86_64/sbin/tegu
.
Create a directory structure for the server:
$ mkdir /opt/tegu
$ mkdir /opt/tegu/{bin,sbin,data,certs}
Copy the executable file to the working directory:
$ cp tegu-ent-v1.42.18-x86_64/sbin/* /opt/tegu/sbin/
$ cp tegu-ent-v1.42.18-x86_64/bin/* /opt/tegu/bin/
Assign user and permissions:
$ chown -R mail. /opt/tegu/{data,certs}
$ chgrp -R mail /opt/tegu/{bin,sbin}
$ chmod 750 /opt/tegu/{data,certs}
$ chmod -R 750 /opt/tegu/sbin
$ chmod -R 750 /opt/tegu/bin
Check if the directories and files are created correctly and if their permissions are correct:
$ ls -l /opt/tegu
It should be something like this:
$ ls -l /opt/tegu
/opt/tegu:
16 total
drwxr-x--- 2 root mail 4096 apr 11 14:32 bin
drwxr-x--- 2 mail mail 4096 Apr 11 14:32 certs
drwxr-x--- 2 mail mail 4096 Apr 11 14:32 data
drwxr-x--- 2 root mail 4096 Apr 11 14:33 sbin
Customize the startup and management mechanism:
$ nano /etc/systemd/system/tegu.service
.
The contents of the /etc/systemd/system/system/tegu.service file should be as follows:
[Unit].
Description=Tegu. MBK-Lab Mail Server

[Service]
ExecStart=/opt/tegu/sbin/tegu
User=mail
Group=mail
UMask=0007
RestartSec=10
Restart=always

[Install]
WantedBy=multi-user.target
Allow the server to run as a non-privileged user:
$ setcap CAP_NET_BIND_SERVICE=+eip /opt/tegu/sbin/tegu.
It is necessary to create a configuration file in /etc/tegu.conf with the following content:
$ nano /etc/tegu.conf
[global].
dataDir = /opt/tegu/data

[Log]
debug = false

[WEB]
adminPassword = admin
httpPort = 8888
httpsPort = 9999
ctlPort = 8899
And change the permissions:
$ chown root.mail /etc/tegu.conf
$ chmod 640 /etc/tegu.conf
During the first startup, the server will look for its configuration file in the following order:
- /etc/tegu.conf
- ~/tegu.conf (for example, /var/mail/tegu.conf).
If the file was not found, it will be created at the path ~/tegu.conf
For detailed logging of the server operation, change the value of the parameter
debug = true
Use the adminPassword parameter value to register in the administrative web-interface (with admin login).
Important - change the administrator password at once to ensure security.
Allow server autorun during OS boot:
$ systemctl enable tegu.service
This command creates a symbolic link to a copy of the service file in /etc/systemd/system/tegu.service at a point on disk,
where systemd looks for files to autorun, and also updates the systemd configuration.
Remember that you must update the systemd configuration whenever you change the configuration in /etc/systemd/system/tegu.service.
The update is done with the command sudo systemctl reload tegu.service.
Start the server (manually):
$ systemctl start tegu.service
Control the service startup (service status):
$ systemctl status tegu.service
A properly working server returns something like this:
● tegu.service - Tegu. MBK-Lab Mail Server
Loaded: loaded (/etc/systemd/system/tegu.service; enabled; vendor preset: enabled)
Active: active (running) since Mon 2022-04-11 13:58:09 MSK; 50min ago
Main PID: 88519 (tegu)
Tasks: 9 (limit: 9357)
Memory: 3.3M
CGroup: /system.slice/tegu.service
└─88519 /opt/tegu/sbin/tegu

Apr 11 13:58:09 systemd[1]: Started Tegu. MBK-Lab Mail Server.
.
If all the previous steps have been completed correctly, you will be able to access the web-based server administration panel where all other settings are made.
This completes the server installation.
Let's move on to the Postgres database server installation.
Installing and configuring of Postgres
apt install postgresql postgresql-contrib
Check the status of the service.
systemctl status postgresql
Right after installation, check if the server is listening to port 5432 and at what address.
ss -lnpt | grep 5432
You should see the following output.
LISTEN 0 244 127.0.0.0.1:5432 0.0.0.0.0:* users:((“postgres”,pid=26097,fd=6)))
LISTEN 0 244 [::1]:5432 [:::]:* users:(((“postgres”,pid=26097,fd=5)))
.
Placing an automatic startup of Postgresql.
systemctl enable postgresql
*Creating databases.
We need to create the tegu user.
Go to postrges
su - postgres -s /bin/bash
Create user:
createuser -d -S -E -P tegu
Create 3 databases.
tegu_queue - queue database
tegu_mailboxes - mailbox storage database
tegu_settings - mail server settings database
createdb -E UTF-8 -O tegu tegu_queue
createdb -E UTF-8 -O tegu tegu_mailboxes
createdb -E UTF-8 -O tegu tegu_settings
Define accesses from subnets.
nano /var/lib/pgsql/data/pg_hba.conf
If version Pro, the path can be as follows
nano /var/lib/pgpro/std-14/data/pg_hba.conf
For example our config pg_hba.conf
# TYPE DATABASE USER ADDRESS METHOD

# “local” is for Unix domain socket connections only
local all all peer
# IPv4 local connections:
host all all 127.0.0.1/32 md5
# IPv6 local connections:
host all all ::1/128 md5
# Allow replication connections from localhost, by a user with the
# replication privilege.
local replication all peer
host replication all 127.0.0.1/32 md5
host replication all ::1/128 md5
host all all 10.199.199.0/24 md5
host all all 10.44.44.0/24 md5
host all all 10.0.0.0.0/8 md5
*
It is also necessary to uncomment in the configuration file port 5432 and ip address from which you can connect to the database.
For example:
listen_addresses = '*' # what IP address(es) to listen on;
# comma-separated list of addresses;
# defaults to 'localhost'; use '*' for all
# (change requires restart)
port = 5432 # (change requires restart)
for the regular version of postgres
nano /var/lib/pgsql/data/postgresql.conf
or for the pro version
nano /var/lib/pgpro/std-14/data/postgresql.conf
After making changes in the configuration files, it is necessary to restart the database to apply the changes in the settings.
Useful commands*
*See what databases we have.
psql -U postgres -c “\l+”
- Delete databases.
psql
DROP DATABASE tegu_mailboxes;
Command to test connection to the database server:
psql -U tegu -d tegu_settings -h 172.16.10.2 -p 5432 -W
-U (username
-d (database name)
-h (database server host)
-p (port)
-W (password)
Initial configuration
Go to the web interface by your ip address I have localhost you will have your own address.
http://localhost:8888
The first thing we will see is the choice of database type, we choose postgreSQL.
We fill in the appropriate settings in the new parameter database.
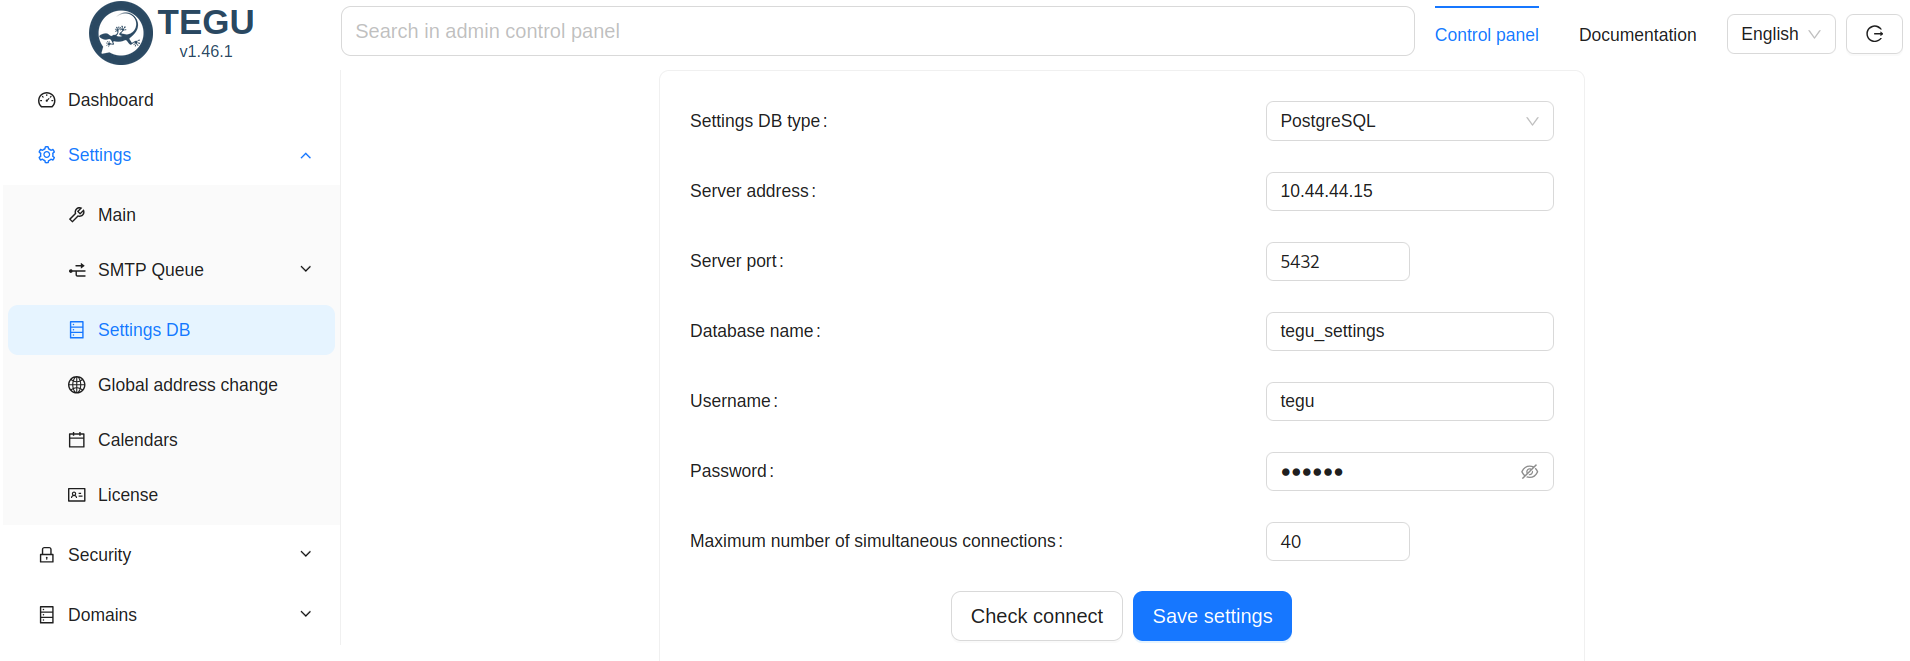
Click save settings.
After saving the mail server will restart and you will see a full web interface, which we need to configure sequentially.
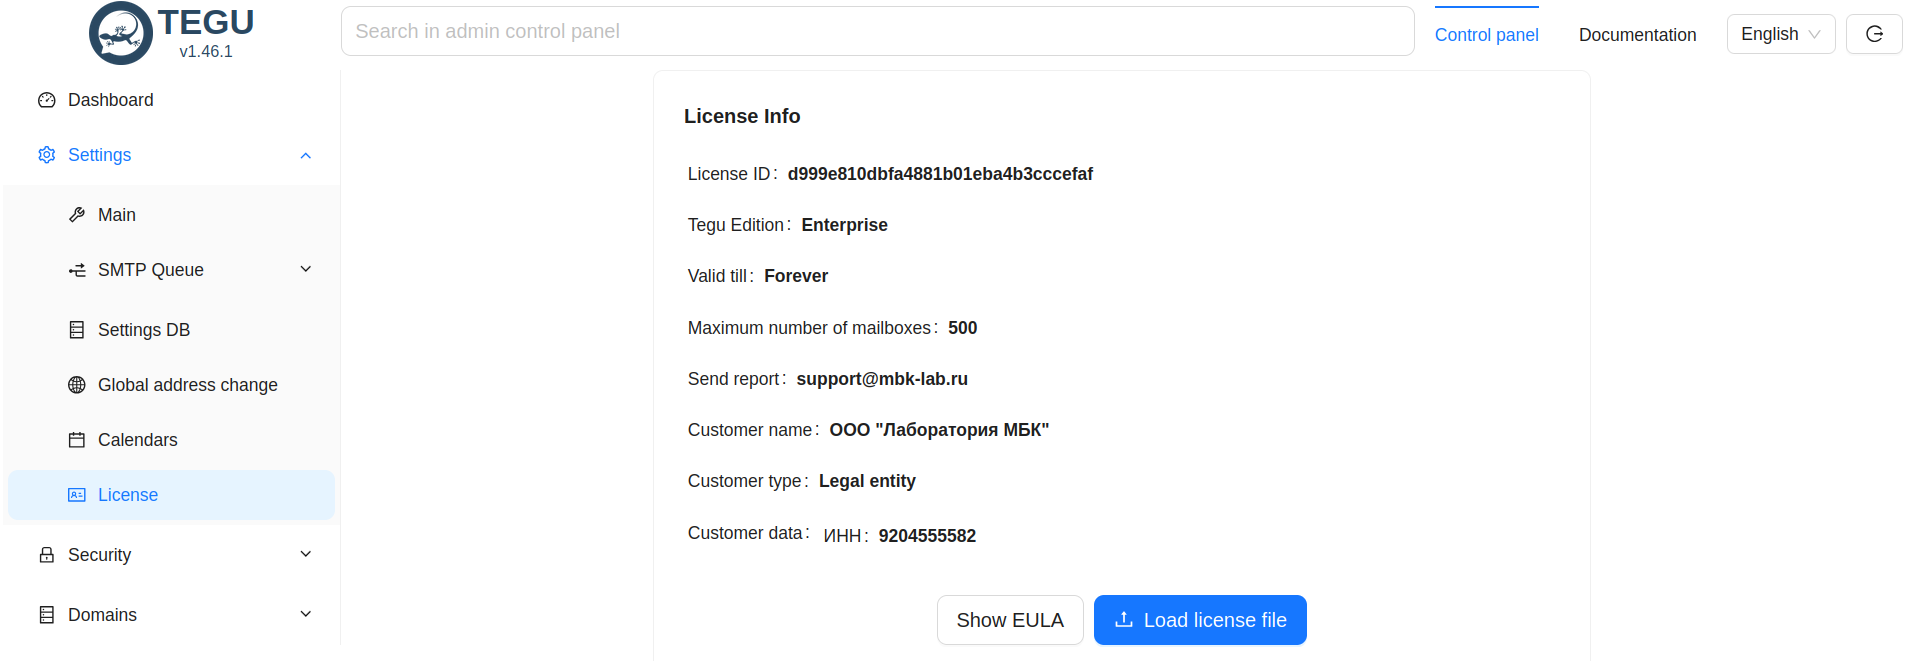
The first thing we will see is the information panel, in which we are immediately attracted by the lack of a license.
The license can be installed either later or immediately, its absence does not affect the settings.
To install the license you should open the section in the panel - settings → license → upload license file.
After uploading the license, you will see in the information panel that the license status has changed.
Tegu main settings
In the main settings, the first thing we see is a new control panel divided into clear sections.
Which we will now fill in in order.
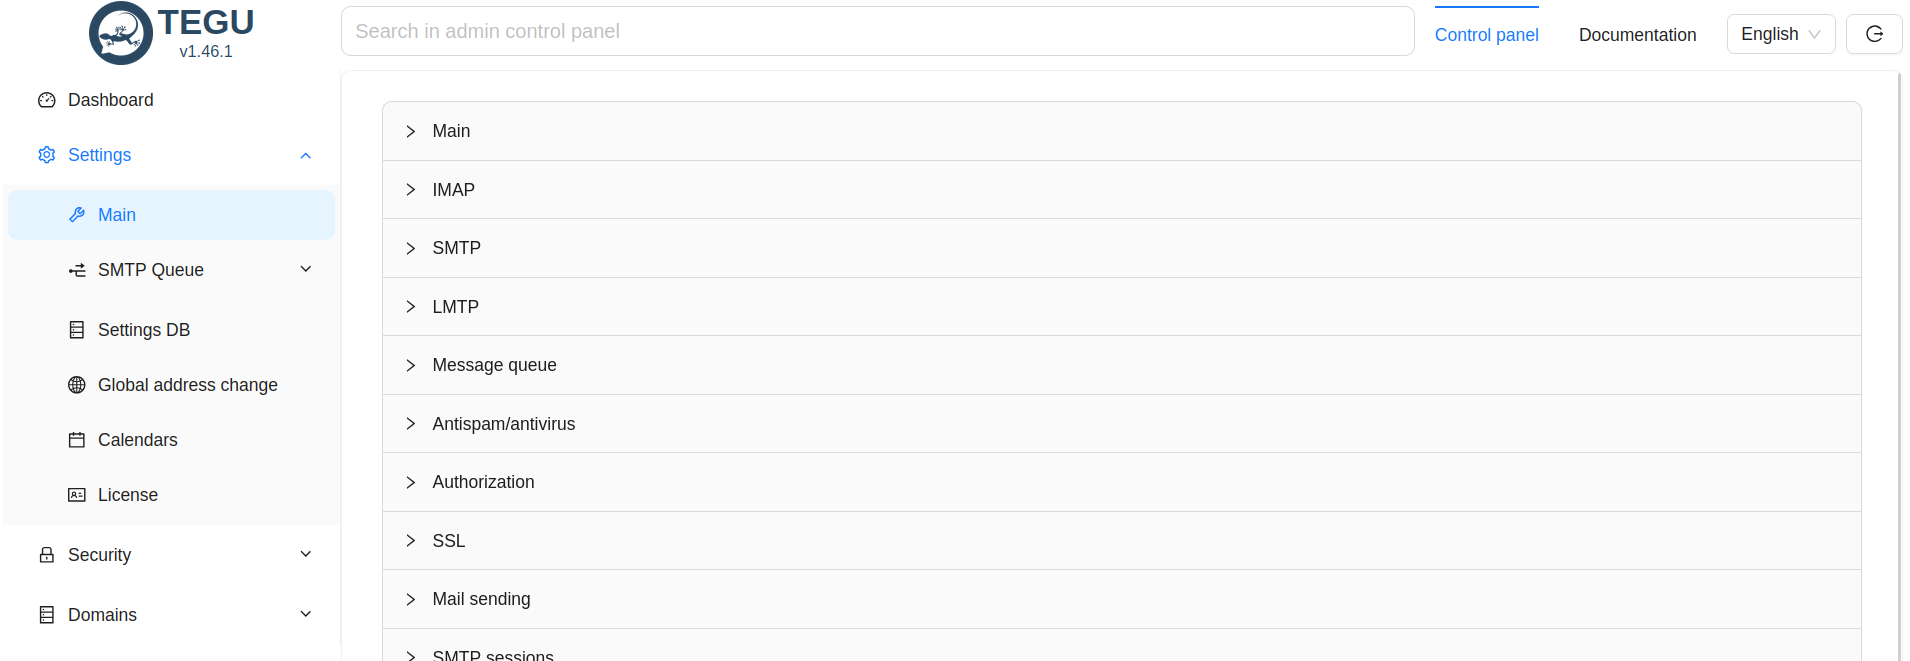
The first thing we see in the main settings:
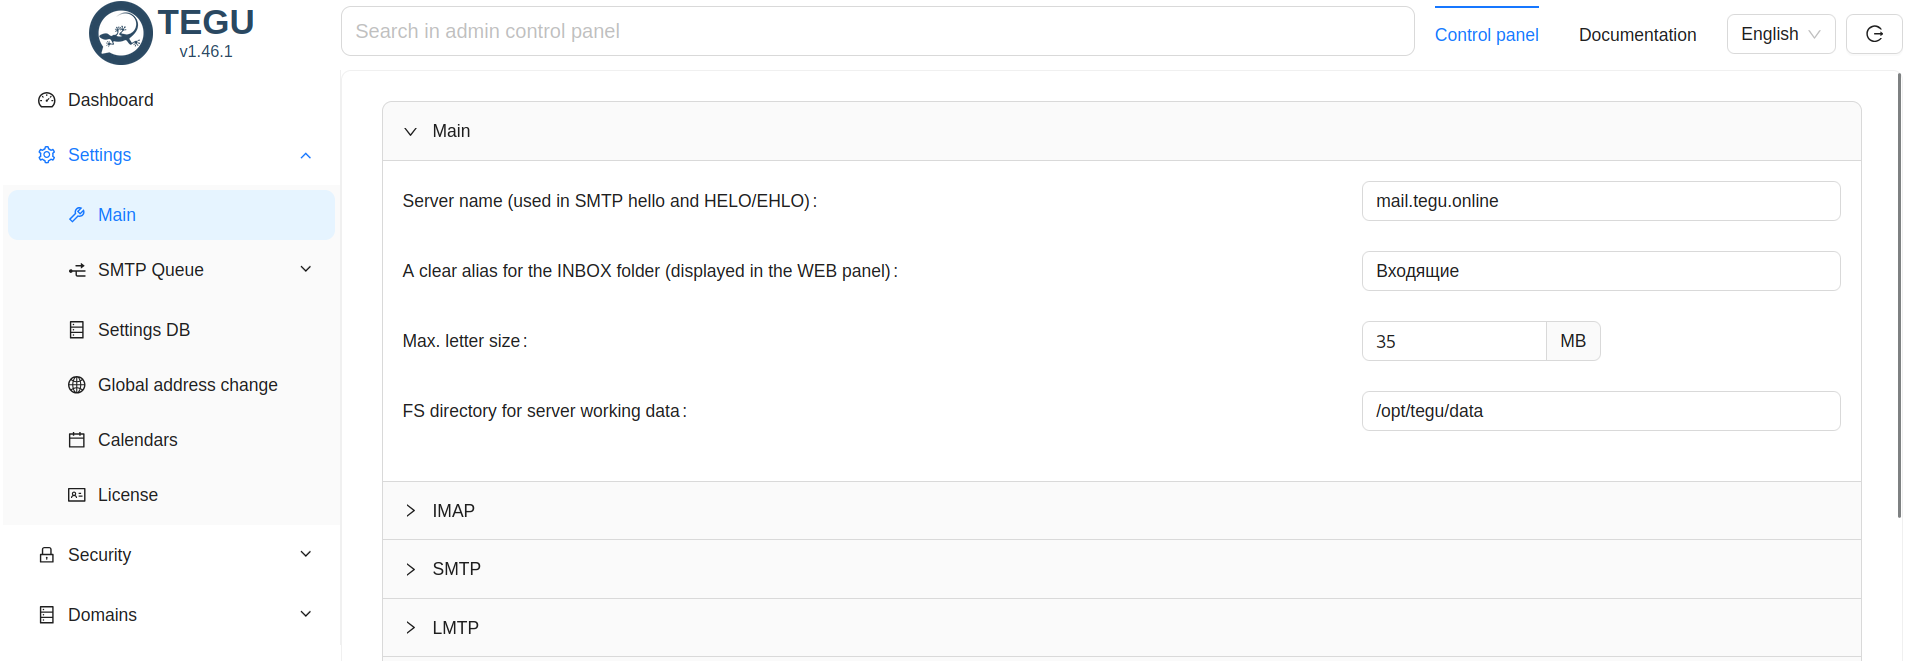
As a rule, many people make a major mistake here: they do not write the name of the mail server, but the name of the node on which the server is installed.
1. basic settings:
In my case here will be the following setting: mail.tegu.online
If DNS zones are correct, then when pinging this resource we will see that the resource responds with an external ip address.

To configure the rest of the parameters we need to add a mail domain:

Important: Pay attention to the parameter - Mail domain.
Here we specify the Internet domain, in our case - tegu.online, but not mail.tegu.online.
After clicking the add domain button, we get to the settings of the mail storage: again select Postgres as the storage.
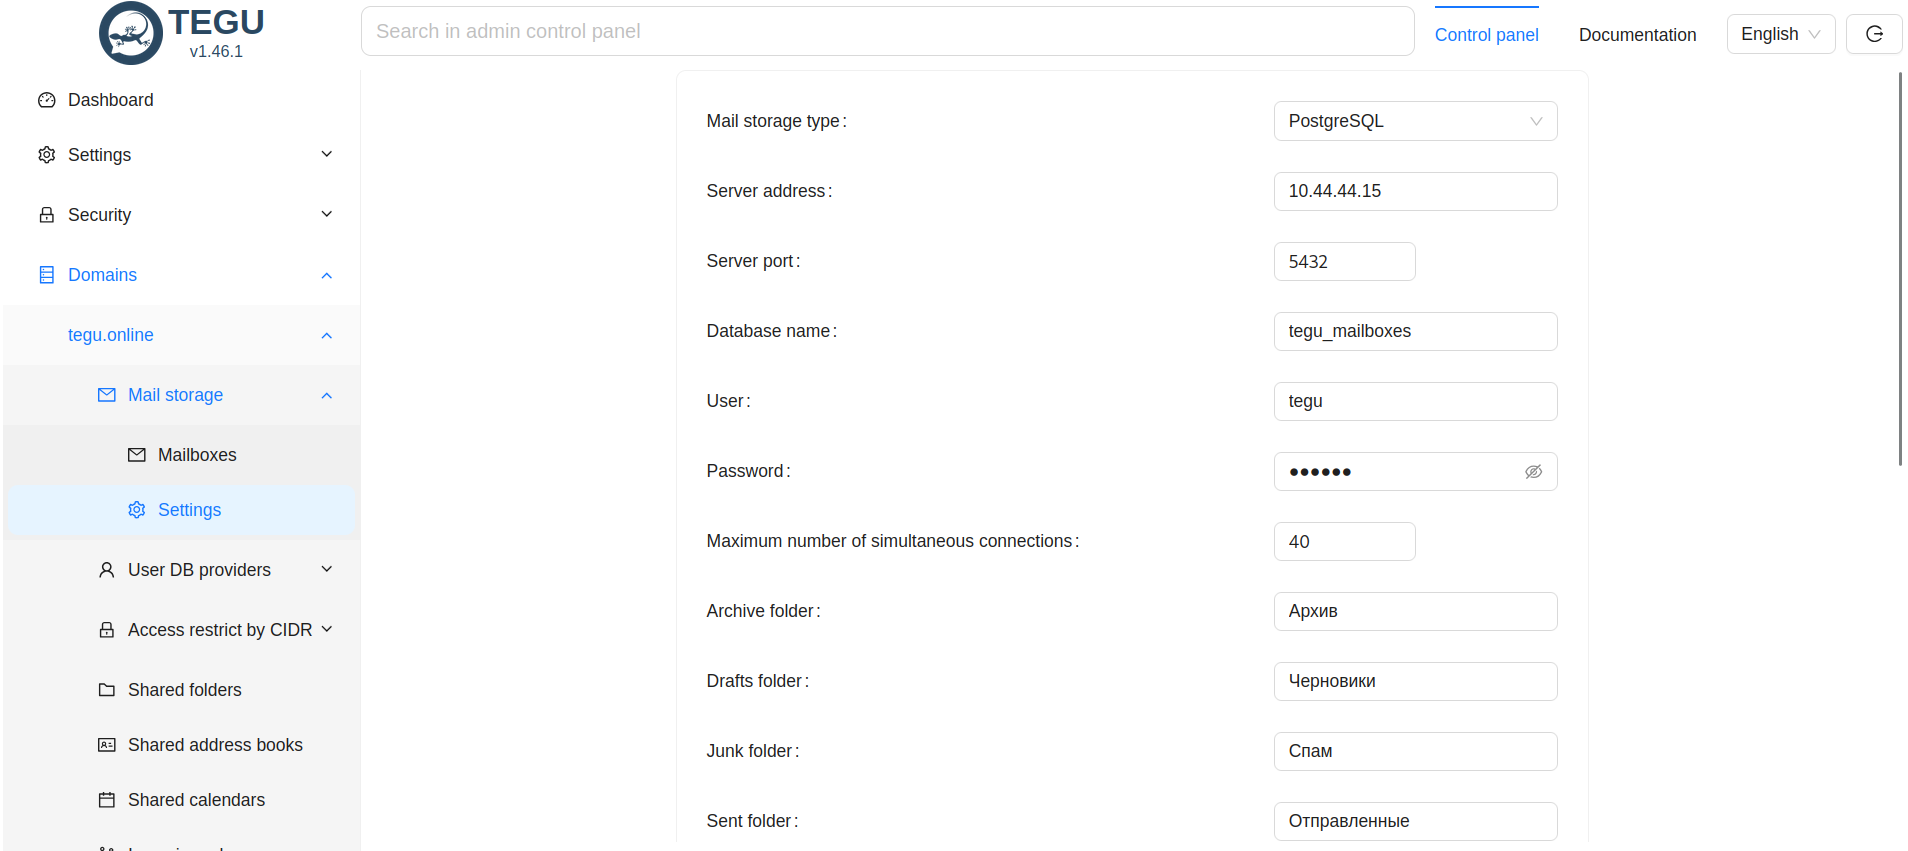
Write the connection settings to the database server, the database name is tegu_mailboxes, login and password.
Here you can also set a quota for all mailboxes, as well as enable the recovery folder,
this is a new feature that will allow you to recover deleted messages from the trash in the future.
Configuring the message queue
When configuring the message queue, select PostgreSQL as the handler
Fill in all the data, it should look like this.
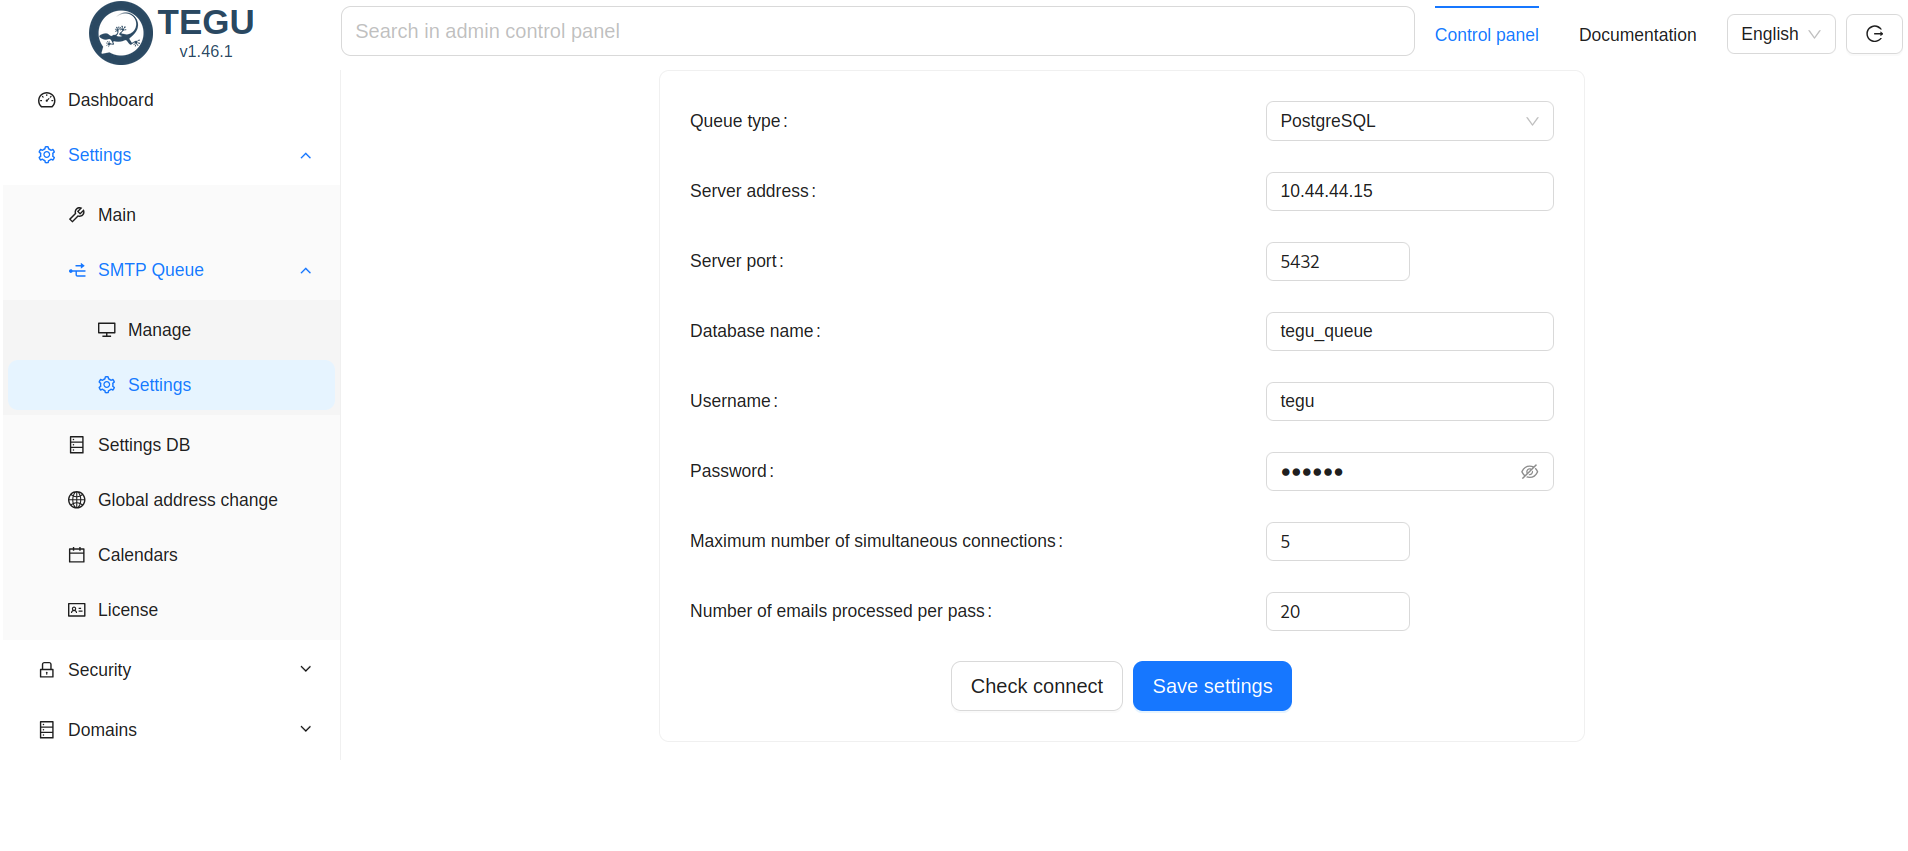
Check the availability of the SQL server and save the parameters.
Configuring user database settings.
Writing LDAP connection settings
Before randomly prescribing something, it is better to use the ldapsearch utility.
This utility will allow us to correctly find and prescribe all the settings.
Let's go to the console of the mail server and in the command line check the correctness of the future connection.
If you don't have the ldapsearch utility, install the ldap-utils package with this command:
apt install ldap-utils
Command Synopsis:
ldapsearch -x -b <search_base> -H <ldap_host> -D <bind_dn> -W.
In my case, the following command is obtained to connect to LDAP:
ldapsearch -x -b “DC=tegu,DC=online” -H ldap://10.44.44.16:389.
The output of the command is quite interesting and speaks for itself.
But we are going to request information about a specific user uid=ikurennov :
$ ldapsearch -x -b “uid=ikurennov,ou=People,DC=tegu,DC=online” -H ldap://10.44.44.16:389
# extended LDIF
#
# LDAPv3
# base <uid=ikurennov,ou=People,DC=tegu,DC=online> with scope subtree
# filter: (objectclass=*)
# requesting: ALL
#

# iurennov,people,tegu.online
dn: uid=ikurennov,ou=People,dc=tegu,dc=online
objectClass: posixAccount
objectClass: inetOrgPerson
objectClass: organizationalPerson
objectClass: person
homeDirectory: /home/ikurennov
loginShell: /bin/bash
uid: ikurennov
uidNumber: 10001
gidNumber: 10000
title:: 0JjjQvdC20LXQvdC10YA=
o:: 0JzQkdCaLdCb0LDQsQ==
mail: ikurennov@tegu.online
sn:: 0JrQsNCNC70YzQvNC10YLQvtCy
givenName:: 0JjjQs9C+0YDRjA==
cn::: 0JrQsNCNC70YzQvNC10YLQvtCyINCY0LPQvtGA0Yw=
jpegPhoto:: /9j/4AAQSkZJRgABAQAQAASABIAAD/7QByUGhvdG9zaG9wIDMuMAA4QklNBAQAAAAAAAAD
ocAVoAAxslRxwCAAACAAIcAigAFm0zTXV6VDhMVHNHQ0JQ0JLWCUwc0t4MEEcAhkAC1Bob3RvIEJvb3R
Bh479yI1rrrF7bn/9k=
facsimileTelephoneNumber: 10000

# search result
search: 2
result: 0 Success

# numResponses: 2
# numEntries: 1
How to interpret this output?
- The mail server can access the LDAP server ldap://10.44.44.16:389 with the login BindDN: cn=admin,dc=tegu,dc=online and your password;
- Defined BaseDN search field dc=tegu,dc=online ;
- Defined Attr field for mailbox e-mail = mail ;
- Defined field Attr for mailbox quota (value in MB) = facsimileTelephoneNumber.
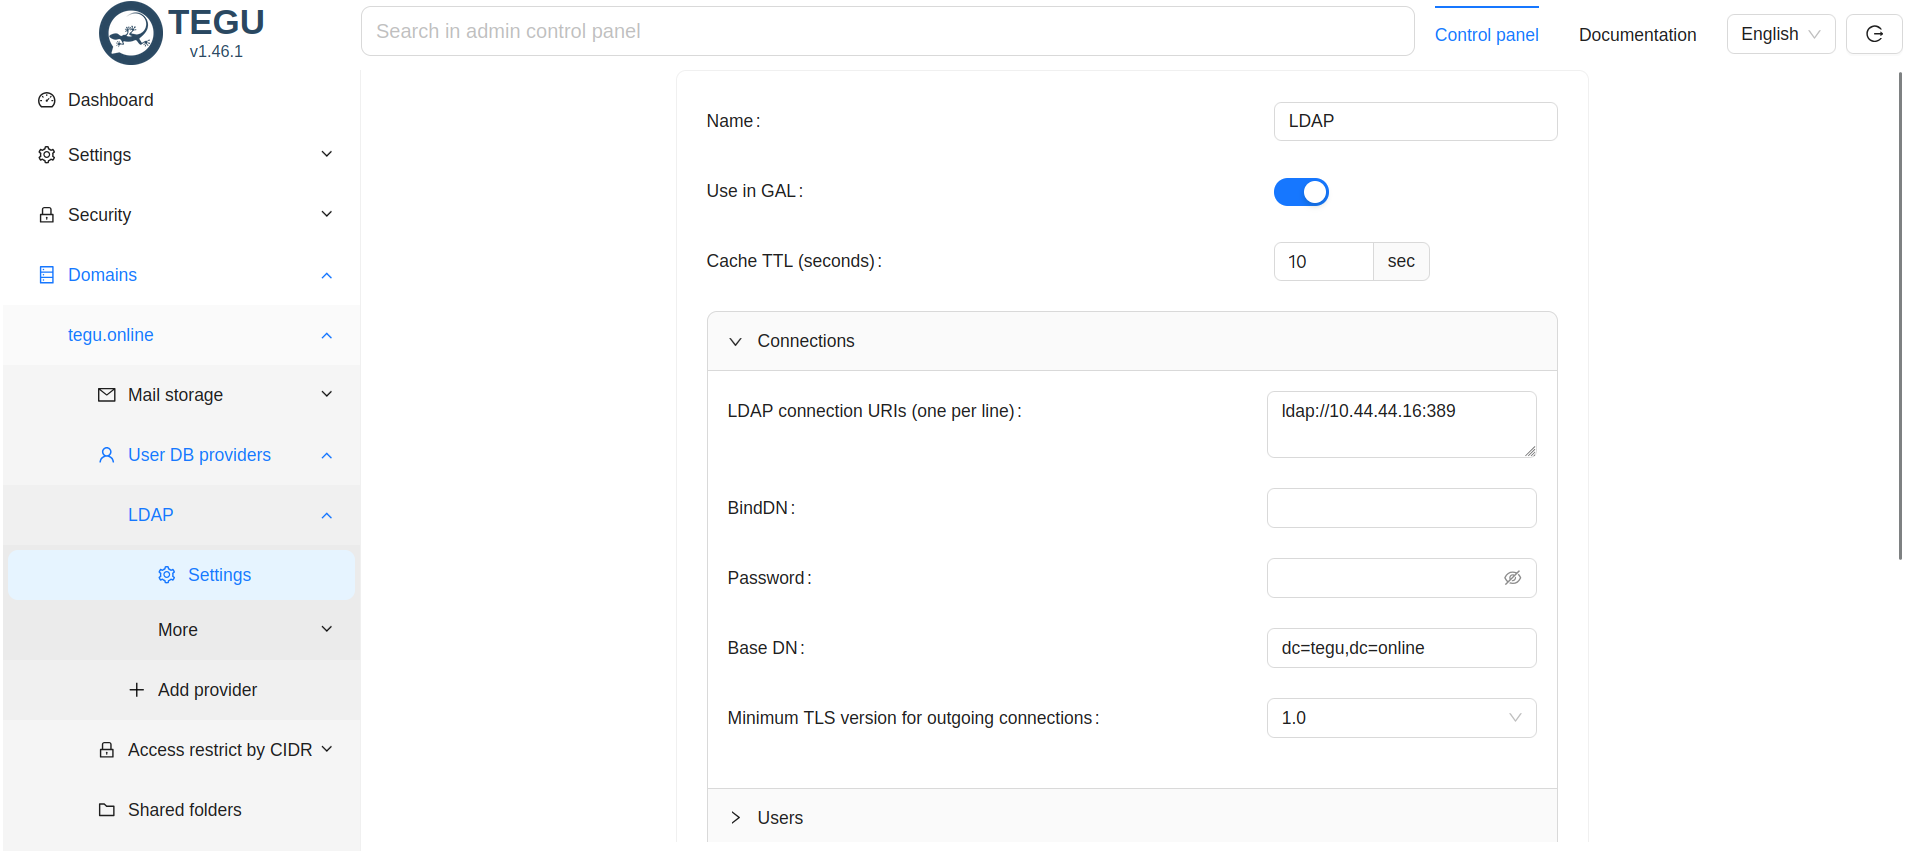
Now let's move on to setting up the Provider of the user database in the Tegu administrative interface.
- The Provider Name field is any text that means the name of the connection;
- Local Domain Name - domain name (not server name, i.e. what follows @ in the email address);
- LDAP server connection URI - found and verified above let to the server;
- BindDN - login;
- Password - password;
- BaseDN - search filter found above..;
- Atr for mailbox e-mail - name of the field, which in LDAP is filled with user's e-mail address (important! with domain suffix);
- Atr for mailbox quota - the name of the field that LDAP uses to define the quota.
This is the minimum that we need to specify for successful integration with the directory server.
Important: Now the BindDN field is written in UPN format - user@realm.com since we are using OpenLDAP,
this option also works with Microsoft AD, but if you are using FreeIPA or ALD Pro as a directory server,
then BindDN must be a full DN (uid=user,ou=org_unit,dc=domain,dc=com).
An example of connecting to Active Directory.
This is enough to start creating users and start getting mail.
Installing and generating Letsencrypt certificates
A certificate authority that provides free X.509 cryptographic certificates
for encrypting HTTPS and other protocols transmitted over the Internet,
used by servers on the Internet.
The certificate issuance process is fully automated.
The Let's Encrypt Certificate Authority issues certificates with a validity period of 90 days.
To obtain a certificate, the following ports must be forwarded: 80, 443.
*Important!
When generating a certificate, or purchasing one, the certificate always must be issued in the name of the mail server,
not the domain name!
*For Debian distributions.
Checking for package updates
apt update
Install Letsencrypt
apt install certbot
Get a certificate for your mail domain
certbot certonly --standalone -m ваша_почта@yandex.ru -d mail.yourdomain.rf
- ваша_почта@yandex.ru - Here you specify a valid working mailbox, where Letsencrypt emails will be sent.
Checking that certificates are received
cd /etc/letsencrypt/live/mail.yourdomain.rf/

ls
should see the following files:
cert.pem chain.pem fullchain.pem privkey.pem README
We are interested in fullchain.pem privkey.pem.
Autoupdate certificates
create a work folder in the root folder, we will need it later.
mkdir work
Create a Letsencrypt hook in the Letsencrypt folder with the following content:
nano /etc/letsencrypt/renewal-hooks/deploy/hook01
#!/bin/sh
do
if [ “$domain” = mail.yourdomain.rf ]
then
/root/work/tegu_certs
/bin/systemctl restart tegu
fi
done
Make it executable
chmod +x /etc/letsencrypt/renewal-hooks/deploy/hook01
Next, create another script
nano /root/work/tegu_certs
and write the following lines in it
#!/bin/bash
cat /etc/letsencrypt/live/mail.yourdomain.rf/fullchain.pem > /opt/tegu/certs/cert.pem
cat /etc/letsencrypt/live/mail.yourdomain.rf/privkey.pem > /opt/tegu/certs/key.pem
chgrp mail /opt/tegu/certs/*
chmod 640 /opt/tegu/certs/*
Making the script executable
chmod +x /root/work/tegu_certs
Change the owner group
chgrp root /etc/letsencrypt/archive/mail.yourdomain.rf/*
Run the script
/root/work/tegu_certs
Check the result of the script
ls -lh /opt/tegu/certs/
Certificates should appear in this folder
cert.pem key.pem
Accordingly, in the main settings of the mail server we specify the following paths to the certificates.
/opt/tegu/certs/cert.pem
/opt/tegu/certs/key.pem
It should look like this.

Once the certificates have been generated and written to the mail server, the “Require TLS/SSL encryption for authorization” option should be enabled in the main settings

Let's restart the mail server:
systemctl restart tegu
*It is important to remember that for successful automatic certificate generation, ports 80 and 443 must be forwarded to the outside.
After all the settings are done, it is only now possible to check which ports the mail server is listening on.
netstat -lnp
In response you should see:
root@tegu:~# netstat -tulpn | grep tegu
tcp 0 0 127.0.0.0.1:8899 0.0.0.0.0:* LISTEN 81/tegu
tcp6 0 0 0 :::8888 :::* LISTEN 81/tegu
tcp6 0 0 0 :::9999 :::* LISTEN 81/tegu
tcp6 0 0 0 :::25 :::* LISTEN 81/tegu
tcp6 0 0 0 :::143 :::* LISTEN 81/tegu
tcp6 0 0 0 :::465 :::* LISTEN 81/tegu
tcp6 0 0 0 :::993 :::* LISTEN 81/tegu
DKIM generation
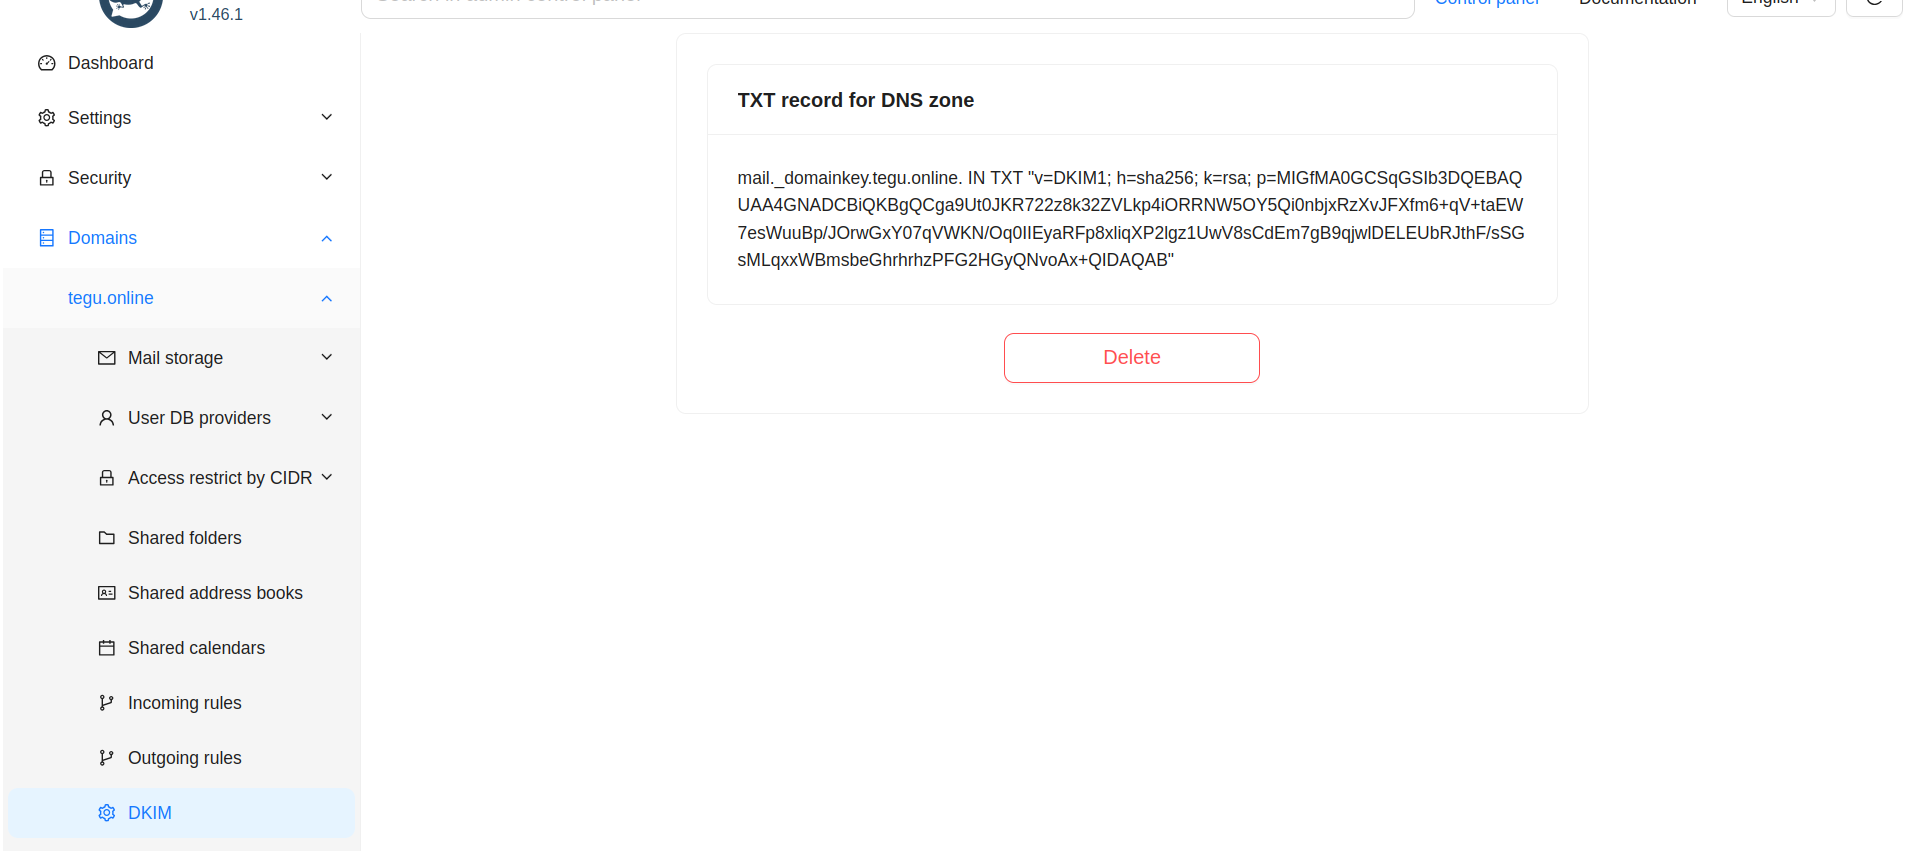
Go to the DKIM section, press the button
Add DKIM key.
Final fine tuning of DNS
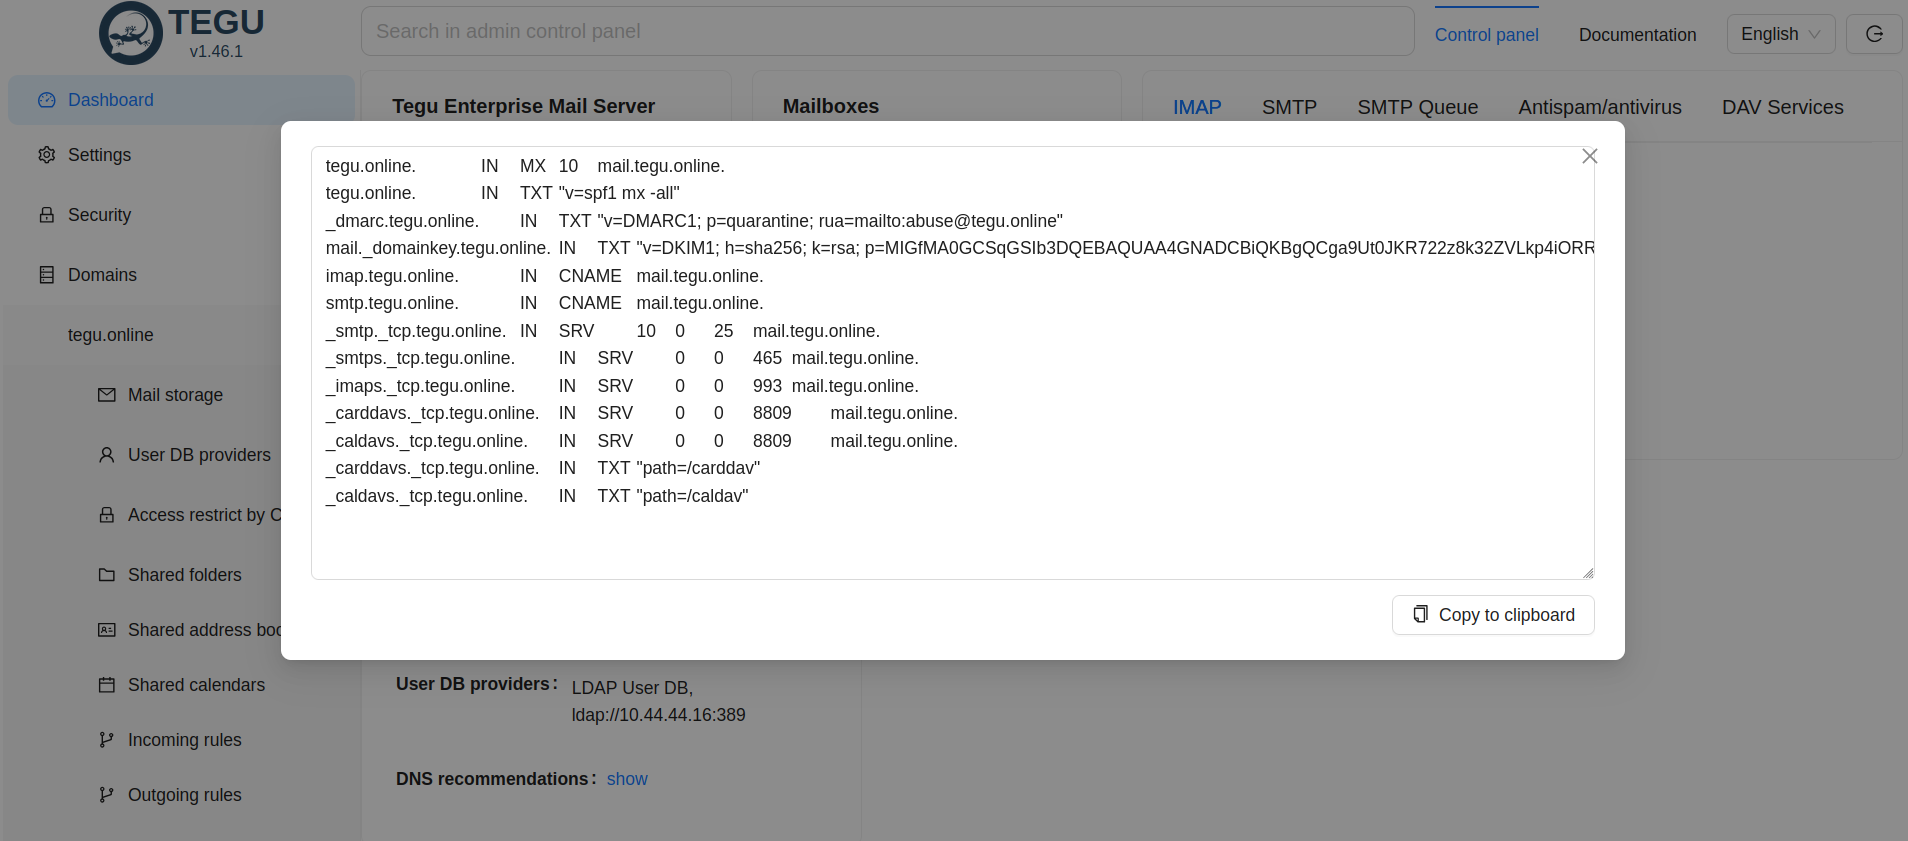
After all the settings are prescribed, who has not previously prescribed DNS zones, go to the Web interface in the section - Information panel
At the very bottom we see all the settings in BIND format, which TEGU advises you to do.
Take care of this with all your attention.
Mailbox management
To create a mailbox in a domain account, you must set:
Login;
Password;
The Email field should contain the user's email address in full format. Example: test@tegu.ooline
Prerequisite for creating a mailbox
User mailboxes are managed in two ways:- By creating an account in the local JSON File User DB. This method is applicable only for very small and single-node servers. And this method is the only one available for TEGU Free edition.
- By creating an account on a directory server (integrated with the mail server). This is the preferred method for most information systems.
- Login;
- Password;
- Email field should contain the user's email address in full format. Example: ik@mbk-lab.ru .
Other fields are optional but recommended. For example, quota, etc.
Creating a mailbox
The specifics of working with mailboxes largely depend on the specifics of the server's work with user credentials.
Earlier we have already written that the server does not synchronize the data of directory servers, it refers to the directory server whenever it is necessary to perform user authorization. At the same time, the server does not save the received information, but only caches it for a while.
Caching is necessary to prevent the mail server from flooding the directory server with requests in case of DDOS.
By default the caching time is 10 seconds and you can change it yourself using the “User DB Providers/<selected provider>/Cache TTL (seconds)” parameter.
This means that the server does not know about the existence of your user created on the directory server until it is necessary to authorize him.
The need for authorization occurs when:
- The server has received mail addressed to that user;
- The server has received mail from that user;
- The user configures client software or registers on a webmail site.
If these situations have not occurred, but the server is not aware of the existence and, as a consequence, does not create a mailbox. Moreover, this user does not participate in the counting of used licenses.
However, at the first attempt to successfully authorize, the mailbox is created automatically.
Deleting a mailbox
Let's consider the reverse situation. You have deleted a user in the domain and the user account no longer exists. This only means that the server is not receiving authorization requests, but it does not mean that the mailbox should be deleted. It will remain on the mail server.
Thus, it means that you have to delete the uninstantiated mailboxes yourself (manually).
To delete a mailbox, use the “Mail Stores/Mail Control Panel <relevant domain>/Mailboxes” dialog box.
This specificity may seem strange at first glance, but it is intended to ensure high security of the mail server.